

4.0
Owner's of the Breville Juicer IKON gave it a score of 4.0 out of 5. Here's how the scores stacked up:


9
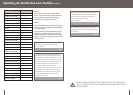
Step 1
Wash selection of fruit and vegetables to be juiced.
Step 2
Ensure the ikon Juice Fountain is correctly
assembled. Refer to Assembling your Breville ikon
Juice Fountain (page 7). Ensure the juice jug (or a
glass) is placed under the spout and the pulp
container is in position before commencing juicing.
Step 3
Plug the power cord into a 110/120v power outlet.
Turn the power on at the power outlet. The LCD
display will illuminate.
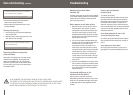
The LCD display will illuminate continuously for 3
minutes before going into a sleep mode, where it
will switch off automatically to conserve power.
The screen will come back on after activating
either the ‘On/Off’ switch or the speed control dial.
When the safety locking arm is not locked into
place on top of the juicer cover, the LCD display
will illuminate and flash with an “L”, indicating that
the safety locking arm should be locked into place.
When the safety locking arm is locked into place
on top of the juicer cover, the LCD display will
illuminate and display the selected speed setting.
The speed can be changed by adjusting the
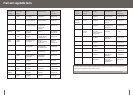
variable speed control dial. For a quick juicing
speed reference, use the speed guide displayed on
the LCD screen, the speed selector table located
on the pulp container, or refer to the speed selector
table (PAGE 10).
Note
Most fruit and vegetables such as apples, carrots
and cucumbers will not need to be cut or
trimmed to size as these will fit whole into the
feed chute. Ensure vegetables such as beetroot,
carrots, etc. have all soil removed, are well
washed and trimmed of leaves before juicing.
Note
Hard fruits and vegetables will put excess strain
onto the motor if a low speed is selected. Please
refer to the speed selector table to determine
the correct speed for the fruits and vegetables
being juiced.
Note
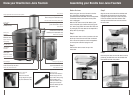
Assembling your Breville ikon Juice Fountain
continued
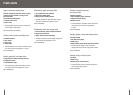
Step 5
Raise the safety locking arm up and locate it into
the two grooves on either side of the juicer cover.
The safety locking arm should now be in a vertical
position and locked into place on top of the
juicer cover.
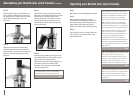
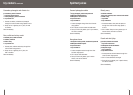
Step 6
Slide the food pusher down the feed chute by
aligning the groove of the food pusher, with the
small protrusion on the inside top of the feed chute.
Continue to slide the food pusher down into the
feed chute.
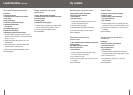
Step 7
Place the pulp container into position by tilting the
base of the pulp container away from the motor base
and slide the top of the pulp container over the
bottom of the juice cover. Tilt the base of the pulp
container back into the motor base ensuring it is
supported by the container support extending from
under the motor base.
Step 8
Place the juice jug provided under the spout on the
right-hand side of the ikon Juice Fountain. The juice
jug lid can be used to avoid any splatter.
Alternatively, you can fit the custom-designed juice
nozzle over the juice spout and place a glass
underneath. The juice nozzle will prevent splatter,
ensuring mess free juicing.
To minimize clean-up, line the pulp container
with a plastic freezer bag to collect the pulp.
Note
8
Operating your Breville ikon Juice Fountain


Find Your Products By Category
Please Login
