
3.2
Owner's of the Sony Clock Radio DREAM MACHINE gave it a score of 3.2 out of 5. Here's how the scores stacked up:
Setting the clock for
the first time
This unit is preset to current EST (Eastern
Standard Time) at the factory, and is powered
by a backup battery. All you need to do the first
time is just plug it in and select your time zone.
1 Plug in the unit.
“year” (about 4 seconds) “month and
date” (about 4 seconds) “current EST
(Eastern Standard Time)” appears in the
display in turn.
2 Press and hold DATE/TIME ZONE for
at least 2 seconds.
Area number “2” flashes in the display.
3 Press TIME SET + or – repeatedly to
select the time zone as follows:
Area number Time zone
1 Atlantic standard Time
2
(default setting)
Eastern standard Time
3 Central standard Time
4 Mountain standard Time
5 Pacific standard Time
6 Yukon standard Time
7 Hawaiian standard Time
4 Press DATE/TIME ZONE to set.
Notes
Though the clock is correctly set at the
factory, discrepancies may arise during
transport or storage. If necessary, set the
clock to the correct time by referring to
“Setting the clock.”
While setting the time zone, you must
perform each step within 65 seconds, or the
time zone setting mode will be cancelled.
When daylight saving time
(summer time) begins
This model automatically adjusts for daylight
saving time (summer time).
“ ” is displayed from the beginning of daylight
saving time (summer time), and disappears at
the end of daylight saving time (summer time)
automatically.
Daylight saving time (summer time) begins
at: 2:00 AM on the second Sunday of March.
Standard time begins at: 2:00 AM on the first
Sunday of November.
To cancel Automatic DST/Summer
Time adjustment during the daylight
saving time (summer time) period
Automatic DST/Summer Time adjustment can
be canceled.
Press and hold DISPLAY/CLOCK and
SNOOZE / BRIGHTNESS at the same time for
at least 2 seconds while the clock is displayed.
“ ” and “OFF” appear in the display to show that
Automatic DST/Summer Time adjustment has
been canceled. The display returns to the clock.
Notes
Time change of Automatic DST/Summer
Time adjustment (see above) is subject to
variations in circumstances and laws of each
country/region. Cancel Automatic DST/
Summer Time adjustment and set the DST
display manually as necessary. Customers
living in a country/region that does not use
daylight saving time (summer time) must
cancel Automatic DST/Summer Time
adjustment before using the unit.
To activate Automatic DST/Summer Time
adjustment again, press and hold DISPLAY/
CLOCK and SNOOZE / BRIGHTNESS at the
same time for at least 2 seconds.
“ ” and “On” appear in the display to show
that Automatic DST/Summer Time
adjustment has been activated. The display
returns to the clock.
Setting the clock
1 Plug in the unit.
2 Press and hold DISPLAY/CLOCK for at
least 2 seconds.
The year starts to flash in the display.
3 Press TIME SET + or – repeatedly to
set the year.
4 Press DISPLAY/CLOCK.
5 Repeat steps 3 and 4 to set the month,
day, hour and minute, and then press
DISPLAY/CLOCK.
The seconds start incrementing from zero.
Notes
While setting the clock, you must perform
each step within 65 seconds, or the clock
setting mode will be cancelled.
When pressing any of the rear buttons, hold
the unit firmly to prevent slippage.
To display the year and date
Press DATE/TIME ZONE once for the year, and
press again for the date.
After a while, the display will change back to
the current time automatically.
Setting the brightness
of the display
Three levels of brightness are available by
pressing
SNOOZE / BRIGHTNESS.
Note
When the alarm is sounding, the brightness
function cannot be used.
Playing the radio
Manual tuning
1 Press RADIO BAND to turn on the
radio and select the AM or FM band.
2 Press TUNING + or – to tune in to a
desired frequency.
3 Adjust the volume using VOL + or –.
Tuning in to a station
The unit automatically scans AM or FM
stations.
1 Press RADIO BAND to turn on the
radio to select the AM or FM band.
2 Press and hold TUNING + or –.
+ : scans upward through the frequency
bands.
– : scans downwards through the frequency
bands.
Scanning starts from the currently-tuned
frequency. When a station is received,
scanning stops.
3 Adjust the volume using VOL + or –.
Preset tuning
You can preset 5 stations for FM and 5 stations
for AM.
Presetting a station
1 Follow steps 1 and 2 in “Manual
tuning” to tune the frequency you wish
to preset.
2 Hold down the desired NATURE
SOUND / PRESET 1 to 5 button until
you hear two beeps.
Example: The following display appears
when you preset FM 105.7 MHz to preset
number 3 for FM.
The display shows the frequency for a few
seconds and then changes back to the
current time.
To change the preset station, tune into the
desired station and hold down the NATURE
SOUND / PRESET 1 to 5 button until you
hear two beeps.
To preset another station, repeat these steps.
Note
If you try to store another station with the same
preset number, the previously stored station
will be replaced.
Tuning in to a preset station
1 Press RADIO BAND to turn on the
radio and select the AM or FM band.
2 Press NATURE SOUND / PRESET 1 to
5 where the desired station is stored.
3 Adjust the volume using VOL + or –.
Improving the
reception
FM: Extend the FM wire antenna fully to
increase reception sensitivity.
AM: Connect the supplied AM loop antenna to
the unit. Rotate the antenna horizontally
for optimum reception.
Note on radio reception
Keep digital music players or mobile phones
away from the AM loop antenna or the FM
antenna, as this may lead to reception
interference.
Selecting a Nature
Sound
This unit includes 5 types of Nature Sounds:
(Sea Waves, Birds, Rain, Brook and Under the
Sea.)
You can choose any one of these by pressing the
corresponding button.
Icons Sound type
Sea Waves
Birds
Rain
Brook
Under the Sea
Note
When other functions are in use, Nature Sound
is not available.
Setting the alarm
The dual alarm function allows you to set two
alarm programs (ALARM ON/OFF A and
ALARM ON/OFF B).
The alarm time can be set for each program
and the alarm sound is selectable from
“NATURE SOUND,” “RADIO,” or “BUZZER.”
Notes
Before setting the alarm, make sure to set the
clock. (See “Setting the clock”)
The factory setting alarm time is “PM 12:00.”
To set the radio alarm, first preset your
favourite station. (See “Presetting a station”)
While setting the alarm, you must perform
each step within 65 seconds, or the alarm
setting mode will be cancelled.
To set the alarm
1 Press and hold ALARM ON/OFF A or
B for a few seconds.
2 Press TIME SET + or – to set the
desired hour, and press ALARM ON/
OFF A or B.
3 Press TIME SET + or – to set the
desired minute, and press ALARM ON/
OFF A or B.
4 Press TIME SET + or – to set the
desired alarm period (“WEEKDAY,”
“WEEKEND” or everyday*), and press
ALARM ON/OFF A or B.
* In the case of everyday, both
“WEEKDAY” and “WEEKEND” are
displayed.
5 Press TIME SET + or – to set the
desired alarm mode (“NATURE
SOUND,” “RADIO,” or “BUZZER”),
and press ALARM ON/OFF A or B.
You can choose one of 3 settings: “NATURE
SOUND,” “RADIO,” or “BUZZER.” Set the
alarm mode as follows:
– NATURE SOUND: see “
Setting the
Nature Sound alarm.”
– RADIO: see “
Setting the radio alarm.”
– BUZZER: see “
Setting the buzzer
alarm.”
Setting the Nature Sound alarm
1 Perform steps 1 to 5 in “To set the
alarm.”
2 Press TIME SET + or – to select
“NATURE SOUND” alarm mode, and
press ALARM ON/OFF A or B.
“NATURE SOUND” appears in the display.
3 Press TIME SET + or – to select the
NATURE SOUND / PRESET 1 to 5,
and press ALARM ON/OFF A or B.
4 Press TIME SET + or – to adjust the
volume, and press ALARM ON/OFF A
or B.
The setting is entered.
5 Press ALARM ON/OFF A or B. “” or
“” appears in the display after about
4 seconds.
Nature sound will sound at the set time.
Setting the radio alarm
1 Perform steps 1 to 5 in “To set the
alarm.”
2 Press TIME SET + or – to select
“RADIO” alarm mode, and press
ALARM ON/OFF A or B.
“RADIO” appears in the display.
3 Press TIME SET + or – to select the
AM band, FM band or the last station,
and press ALARM ON/OFF A or B.
If you select the last station, jump to step 5.
4 Press TIME SET + or – to select the
station, and press ALARM ON/OFF A
or B.
5 Press TIME SET + or – to adjust the
volume, and press ALARM ON/OFF A
or B.
The setting is entered.
6 Press ALARM ON/OFF A or B. “” or
“” appears in the display after about
4 seconds.
The radio will turn on at the set time.
Setting the Buzzer alarm
1 Perform steps 1 to 5 in “To set the
alarm.”
2 Press TIME SET + or – to select
“BUZZER” alarm mode, and press
ALARM ON/OFF A or B.
The setting is entered.
3 Press ALARM ON/OFF A or B. “” or
“” appears in the display after about
4 seconds.
The buzzer will sound at the set time.
When the alarm setting is completed, the alarm
time setting is displayed.
When both ALARM “” and ALARM “” are
turned on, you can switch the ALARM A and
ALARM B display by pressing DISPLAY/
CLOCK.
Notes
When you use the radio alarm, the timed
alarm sounds with the last broadcasting
station tuned to before the power went off.
When you set the radio alarm, select the
desired broadcasting station before turning
the power off.
The ALARM “” (or “”) indicator flashes
in the display when the alarm sounds.
If a second alarm sounds during a first (or
the SNOOZE function is active), the second
alarm takes priority.
The alarm function works as usual at the
beginning and end day of daylight saving
time (summer time). While Automatic DST/
Summer Time adjustment is set, as a result, if
the alarm is set at a time skipped when the
daylight saving time (summer time) begins,
the alarm is skipped, or if the alarm is set at a
time overlapped when the daylight saving
time (summer time) ends, the alarm sounds
twice.
If the same alarm time is set for both alarms
(ALARM A and B), ALARM A takes priority.
To confirm an alarm time setting
Turn off the ALARM ON/OFF “” or “”
indicator in the display, and press the ALARM
ON/OFF A or B button again.
You can confirm the alarm time by pressing
TIME SET + or – after the alarm time is set.
To change an alarm setting
There are two ways to set the alarm:
To change all alarm settings
Set the alarm again.
To change an alarm time only
When setting the alarm (ALARM “” or
ALARM “” appears), this function is
available.
Press and hold TIME SET + for at least 2
seconds to move the alarm time forwards. Press
and hold TIME SET – for at least 2 seconds to
move the alarm time back. When you release
the button, the changed time will be displayed
for about 2 seconds. To change the alarm time,
press TIME SET + or – within these 2 seconds,
otherwise the setting change will be fixed as
displayed.
To doze for a few more minutes
Press SNOOZE / BRIGHTNESS.
The sound turns off but will automatically
come on again after about 10 minutes.
You can change the snooze time by pressing
SNOOZE / BRIGHTNESS repeatedly within
4 seconds.
The maximum snooze time is 60 minutes.
To stop the alarm
Press OFF ALARM RESET to turn off the
alarm.
The alarm will sound again at the same time
depending on the next day setting.
To deactivate the alarm
Press ALARM ON/OFF A or B to turn off the
ALARM “” or “” indicator in the display.
Note on the alarm in the event of a power
interruption
In the event of a power interruption, the alarm
will work until the internal battery is worn out.
However, certain functions may be affected as
follows:
The backlight will not light up.
If the alarm mode is set to Nature Sound or
radio, it will change to BUZZER
automatically.
If a power interruption occurs while the
alarm is sounding, the alarm will stop.
If OFF ALARM RESET is not pressed, the
alarm will sound for about 5 minutes.
If “” appears in the display, the alarm will
not sound in the event of power interruption.
Replace the battery if “” appears.
The snooze function will not work.
During a power interruption, the alarm will
sound at the set time only once.
Setting the sleep
timer
You can fall asleep to the “NATURE SOUND,”
“RADIO,” or “AUDIO IN” using the built-in
sleep timer that turns off the “NATURE
SOUND,” “RADIO,” or “AUDIO IN”
automatically after a preset duration.
1 Press SLEEP while the unit is turned
on.
“SLEEP” appears and the sleep time flashes
in the display.
2 Press SLEEP to set the sleep timer
duration.
Each time you press SLEEP, the duration
(in minutes) changes as follows:
90 60 30 15
OFF
The display returns to clock mode for about
4 seconds after you have finished the
duration setting and released SLEEP, and
then the sleep timer starts.
The unit will play for the duration you set,
and then shut off.
Note
Even if the Sleep Timer is set, it cannot turn off
the power of optional components connected to
the AUDIO IN jack of this player.
To turn off the unit before the preset
time
Press OFF ALARM RESET.
To change the sleep timer setting
You can press SLEEP repeatedly to select the
desired sleep timer setting even after the sleep
timer has been activated.
To deactivate the sleep timer
Press SLEEP repeatedly to set the sleep timer to
“OFF” in step 2.
Using the
temperature function
This unit includes an external temperature
sensor, allowing you to monitor ambient
temperature.
The temperature is displayed in Fahrenheit or
Centigrade.
To switch between Fahrenheit and Centigrade,
press and hold the SNOOZE / BRIGHTNESS
and DATE/TIME ZONE buttons for more than
2 seconds.
Notes
In the example, the display shows Fahrenheit;
however, Centigrade can also be displayed.
Do not use in water.
Do not forcefully pull on the external
temperature sensor. Improper use of the
external temperature sensor may cause a
malfunction.
The display temperature and actual
temperature may differ depending on the
usage environment.
Do not place the temperature sensor near the
floor, a heat source such as a radiator or
airduct, or in a place subject to direct
sunlight.
The temperature sensor reading may differ
from actual surrounding temperature.
The operating temperature range is 5 °F
(–15 °C) to 122 °F (50 °C).
In the case of lower than 5 °F (–15 °C) or
higher than 122 °F (50 °C), the “Lo” or “Hi”
indicator appears.
When plugging in the unit or recovering
from a power interruption, the temperature
display of this unit will flash “--”.
The temperature will be displayed after 20
seconds.
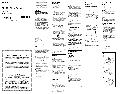
Connecting external
equipment (See fig.
)
To listen to sound
1 Connect the built-in audio cable with
the stereo-miniplug on the bottom of
the unit to the line output jack or
headphones jack on the optional
component (e.g., portable music
player).
2 Press AUDIO IN.
“AUDIO IN” appears in the display.
3 Play the optional component
connected to the unit’s built-in audio
cable.
4
Adjust the volume using VOL + or –
and the connected component’s
volume.
To return to the radio
Press RADIO BAND.
The frequency is shown in the display.
To stop listening
Press OFF ALARM RESET, and stop playback
on the connected unit.
To turn off the sound from the
optional component
Press OFF ALARM RESET, and then turn off
the optional component.
Notes
Refer also to the connected equipment’s
manual.
Connect the audio cable firmly to prevent a
malfunction.
Keep digital music players away from the
speaker.
If you increase the volume too much, loud
sound may occurs when switching to the
radio.
Confirm the volume when you remove the
connected component from this unit to listen
by headphones. Otherwise, high volume may
affect your hearing.
AUDIO IN cannot be set for the alarm
sound.
When you listen to the radio with external
equipment connected, turn off the connected
equipment to prevent noise. If noise occurs,
even when the equipment is turned off,
disconnect and place the external equipment
away from the unit.
Built-in
audio cable
To the
headphones
jack or line
output jack
The built-in audio cable can be inserted
in the slot of the unit.
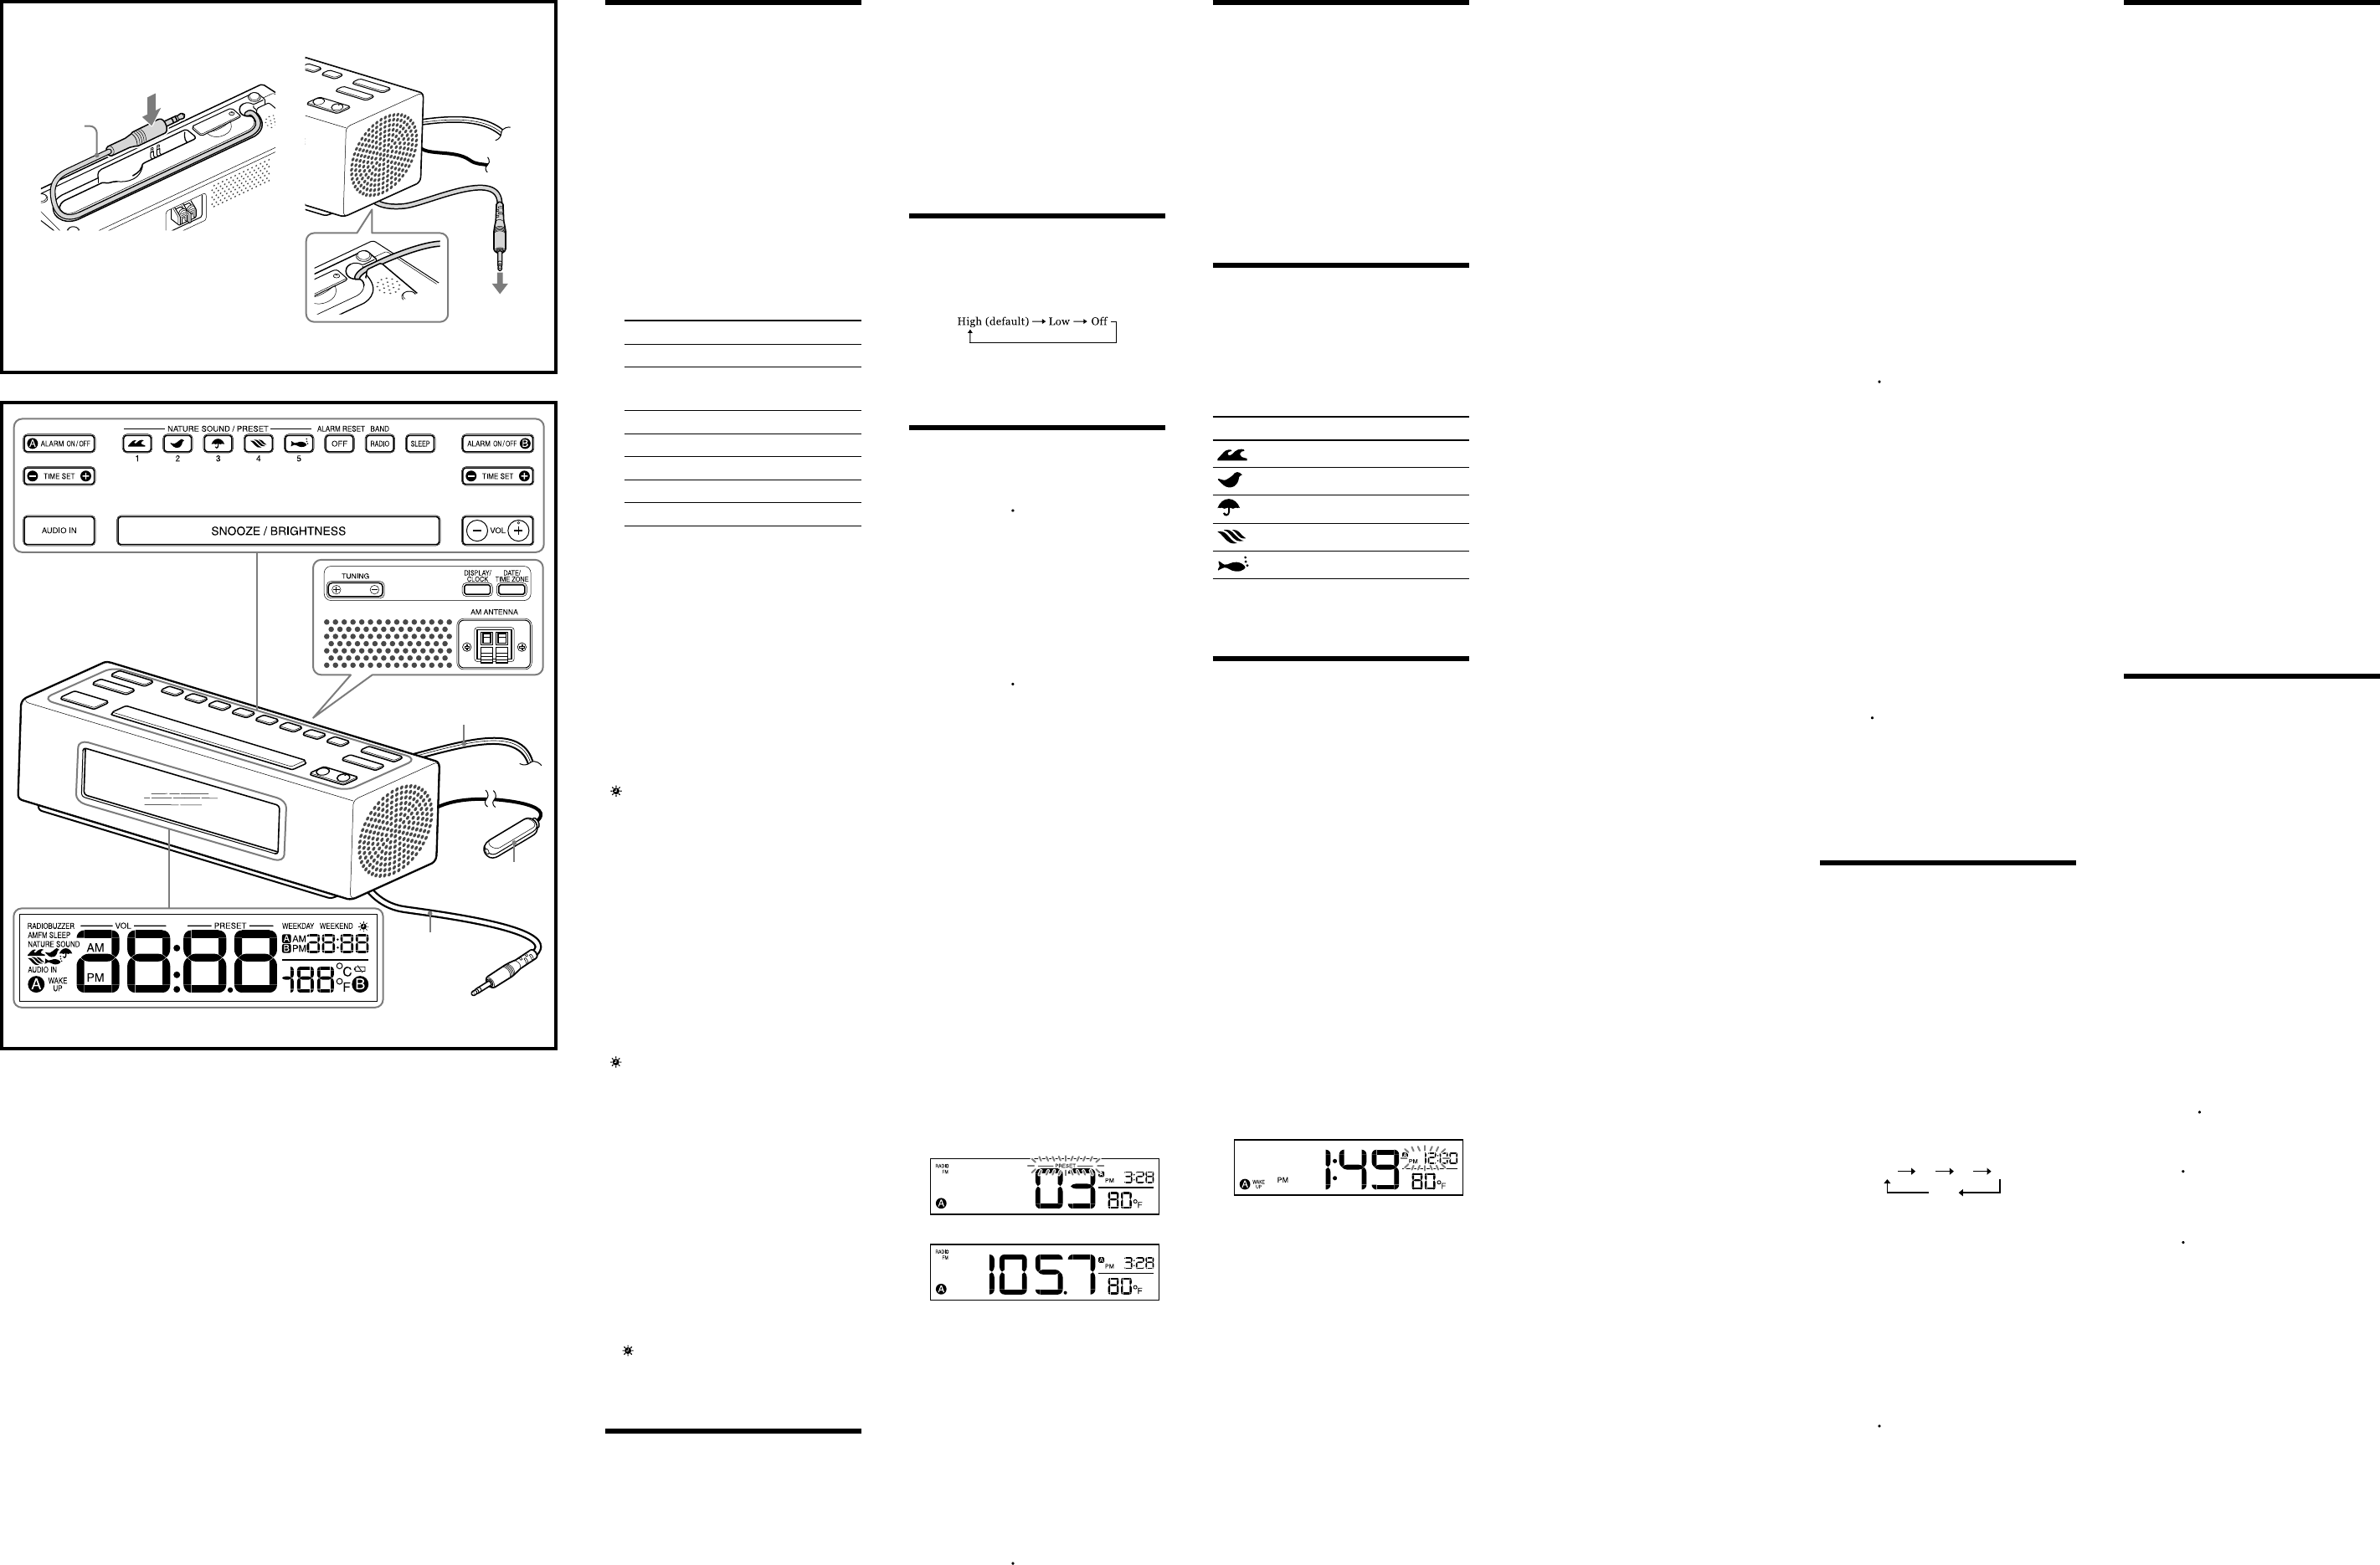
The VOL + button has a tactile dot.
AC power cord
Temperature
sensor
Built-in
audio cable
FM wire antenna


Find Your Products By Category
Please Login
