
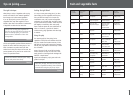
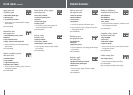
4.1
Owner's of the Breville Juicer BJE200XL gave it a score of 4.1 out of 5. Here's how the scores stacked up:

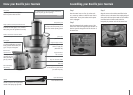
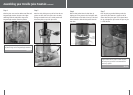
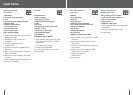

Disassembling your Breville Juice Fountain
12
Step 1
Push the ‘ON/OFF’ button on Juice Fountain to ‘OFF’
and then switch ‘OFF’ at the power outlet and unplug.
Important
Wait for the filter basket to stop spinning before
continuing to step 2.
Step 2
Pull the locking arm back over the grooves on either
side of the juicer cover.
Step 3
Move the locking arm down.
Step 4
Remove the integrated pulp container (preferably
with the juicer cover, stainless steel mesh filter and
food pusher in place) by lifting vertically from the
motor base. Take it to the sink for easy cleaning.
1
2
4
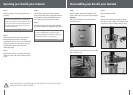
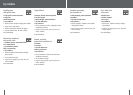
Operating your Breville Juice Fountain
11
Step 1
Wash your selection of fruit and vegetables ready
for juicing.
Most fruit and vegetables such as small apples,
carrots and cucumbers will not need to be cut to
size as these will fit into the feed chute whole.
When juicing carrots place the tip of the carrot
into the feed chute last.
Note
Step 2
Ensure the Juice Fountain is correctly assembled.
Ensure the stainless steel filter is thoroughly
cleaned before each use (refer to care and cleaning)
(See page 13). Make sure you place the juice jug
with lid fitted (or glass) under spout before
commencing juicing.
Step 3
Plug the power cord into a 110/120V power outlet
and turn the power ‘ON’. Push the ‘ON/OFF’ button
to ‘ON’.
Step 4
With the motor running, place food into the feed
chute. Using the food pusher, gently guide food down
the feed chute. To extract the maximum amount of
juice, always push the food pusher down slowly.
Step 5
Juice will flow into the juice jug and the separated
pulp will accumulate in the integrated pulp container.
When the integrated pulp container is full of pulp,
it must be emptied before continuing to juice.
(Refer to disassembling instructions on Page 11).
Reassemble machine to continue juicing.
Note
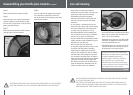
NEVER USE FINGERS TO PUSH FOOD DOWN THE FEED CHUTE OR TO CLEAR THE FEED CHUTE.
AL
W
A
YS USE THE FOOD PUSHER PROVIDED.
3


Find Your Products By Category
Please Login
