

4.2
Owner's of the Breville Frozen Dessert Maker Smart Scoop Ice Cream Machine gave it a score of 4.2 out of 5. Here's how the scores stacked up:


14
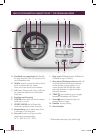
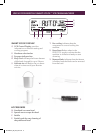
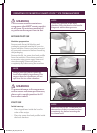
OPERATING YOUR BREVILLE SMART SCOOP ™ ICE CREAM MACHINE
a) Ensure that the paddle and bowl, and
bowl chamber are clean.
b) Add ingredients to the ice cream bowl as
specified in the recipes. Wipe any spilled
ingredients from the rim of the bowl.
c) Insert the bowl into the bowl chamber
by pressing down firmly on the rim of
the bowl until it is securely in position.,
ensuring bowl handle hinges sit inside
grooves on the chamber. It is important
that the ice cream bowl is properly
assembled onto the drive shaft to ensure
that the paddle operates correctly.
d) Align the hole in the bottom of the
paddle with the drive shaft in the bowl.
Push down firmly and secure into place.
e) It is important that the paddle is properly
assembled onto the drive shaft to ensure
that ingredients are churned properly.
f) Place the lid onto the ice cream bowl.
It is not recommended to open the lid
during operation unless stated in the
recipe or if mix ins are required.
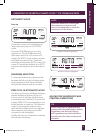
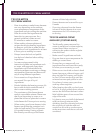
g) To change the temperature reading from
C to F press the
button.
h) Press volume button to select from high,
low, music or mute.
i) To start making the dessert press
START | PAUSE. Once you press
START | PAUSE all of the indicators
on the selection bar will disappear and
ONLY the selected dessert/consistency
indicator will remain. As the dessert
starts to freeze the indicators on the
selection bar will display and scroll up
the selection bar to the chosen dessert.
This may take up to 60 minutes before
indicators illuminate. The ice cream
machine should now start cooling and
churning to the desired setting. The
LCD screen will toggle between the
elapsed churning time and the current
temperature that the machine is chilling,
'KEEP COOL' and 'COOLING' will
illuminate. An indicator will sit above
the selected hardness setting.
NOTE
If the START | PAUSE button is
pressed during the cycle this will
pause the time. To resume the
process press the button again. If
you need to reset the timer press
and hold the START | PAUSE button
for 2 seconds and this will reset the
selection.
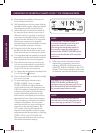
j) When the desired setting has been
reached the compressor and motor
will stop. READY will illuminate and
REMOVE BLADE will flash on the LCD
display. The chosen indicator will sound
to alert the user that the dessert is ready.
NOTE
The READY will illuminate and
REMOVE BLADE will flash for 10
minutes only, and then turn off. It can
also be turned off ahead off this time
by pressing any button or dial.
NOTE
It could take up to 60 minutes for
the indicators on the selection bar to
start moving up on the LCD display.
AUTOMATIC MODE
BCI600XL_IB_E12_FA.indd 14 7/02/12 2:58 PM


Find Your Products By Category
Please Login
