0

Out of 0 Ratings

Owner's of the Marantz Car Stereo System AV Pre Tuner gave it a score of 0 out of 5. Here's how the scores stacked up:
  • Reliability

    0 out of 5
  • Durability

    0 out of 5
  • Maintenance

    0 out of 5
  • Performance

    0 out of 5
  • Ease of Use

    0 out of 5
Page 31
of 186
 
27
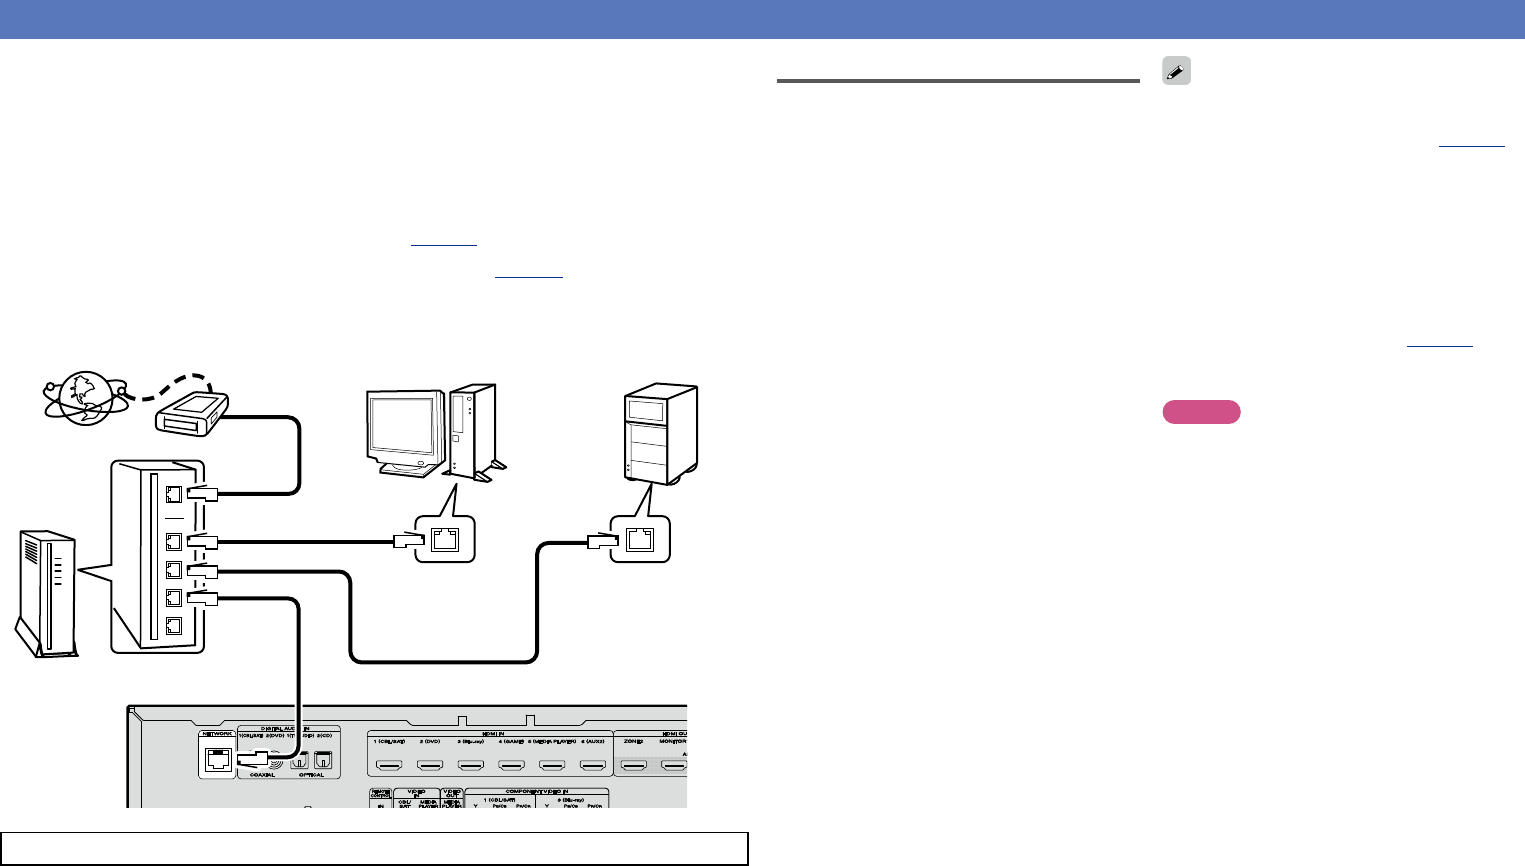
Connecting to a home network (LAN)
You can connect this unit to your home network (LAN) to perform various types of playbacks and operations
as follows. Make network connections for this unit by carefully reading information on this page.
•Playback of network audio such as the Internet radio and music servers
•Playback of music from online services
•AirPlay
•Operations on this unit via the network
In addition, when an updated firmware becomes available for improving this unit, the update information is
delivered from us to this unit over the network. You can then download the latest firmware.
For more information, on the menu, select “Update” (vpage138).
Network settings are necessary. See “Network” on the menu (vpage130) for more information on
network setting.
Internet
To WAN side
Router
To LAN port
To LAN port
LAN port/
Ethernet
connector
LAN port/
Ethernet
connector
PC
NAS
(Network Attached
Storage)
Modem
For connections to the Internet, contact an ISP (Internet Service Provider) or a computer shop.
Required system
n Broadband internet connection
n Modem
Device that connects to the broadband circuit
and conducts communications on the Internet.
A type that is integrated with a router is also
available.
n Router
When using this unit, we recommend you use
a router equipped with the following functions:
•Built-in DHCP server
This function automatically assigns IP
addresses on the LAN.
•Built-in 100BASE-TX switch
When connecting multiple devices, we
recommend a switching hub with a speed of
100 Mbps or greater.
n Ethernet cable
(CAT-5 or greater recommended)
•Use only a shielded STP or ScTP LAN cable
which is available at retailer.
•The normal shielded-type Ethernet cable
is recommended. If a flat-type cable or
unshielded-type cable is used, other devices
could be affected by noise.
•If you have an Internet provider contract for a line
on which network settings are made manually,
make the settings at “Network” (vpage130).
•With this unit, it is possible to use the DHCP and
Auto IP functions to make the network settings
automatically.
•When using this unit with the broadband router’s
DHCP function enabled, this unit automatically
performs the IP address setting and other
settings.
When using this unit connected to a network with
no DHCP function, make the settings for the IP
address, etc., at “Network” (vpage130).
•When setting manually, check the setting
contents with the network administrator.
NOTE
•A contract with an ISP is required to connect to
the Internet.
No additional contract is needed if you already
have a broadband connection to the Internet.
•The types of routers that can be used depend on
the ISP. Contact an ISP or a computer shop for
details.
•marantz assumes no responsibility whatsoever
for any communication errors or troubles
resulting from customer’s network environment
or connected devices.
•This unit is not compatible with PPPoE. A PPPoE-
compatible router is required if you have a contract
for a type of line set by PPPoE.
•Do not connect an NETWORK connector directly
to the LAN port/ Ethernet connector on your
computer.
•To listen to audio streaming, use a router that
supports audio streaming.
Basic version
Advanced version
Information
Basic version
DVD
28
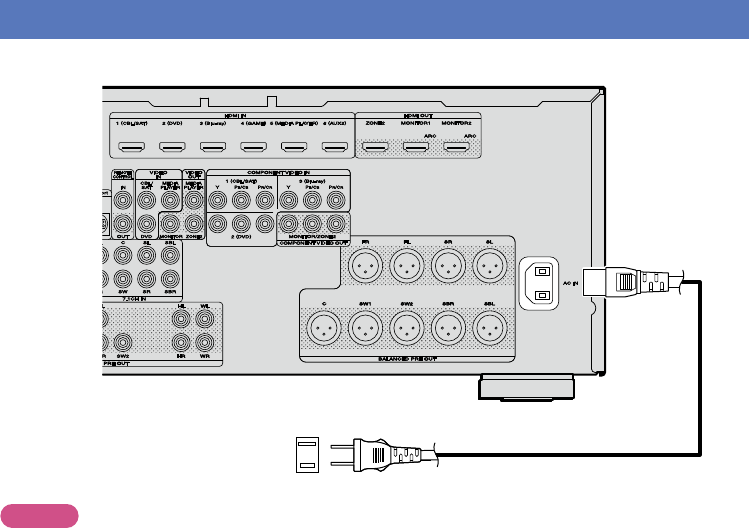
Connecting the power cord
After completing all the connections, insert the power plug into the power outlet.
To household power outlet
(AC 120 V, 60 Hz)
Power cord (supplied)
NOTE
•Do not plug in the power cord until all connections have been completed.
•Do not bundle power cords together with connection cables. Doing so can result in humming or noise.
Basic version
Advanced version
Information
Basic version
DVD
29
The acoustic characteristics of the connected speakers and
listening room are measured and the optimum settings are made
automatically. This is called “Audyssey
®
Setup”.
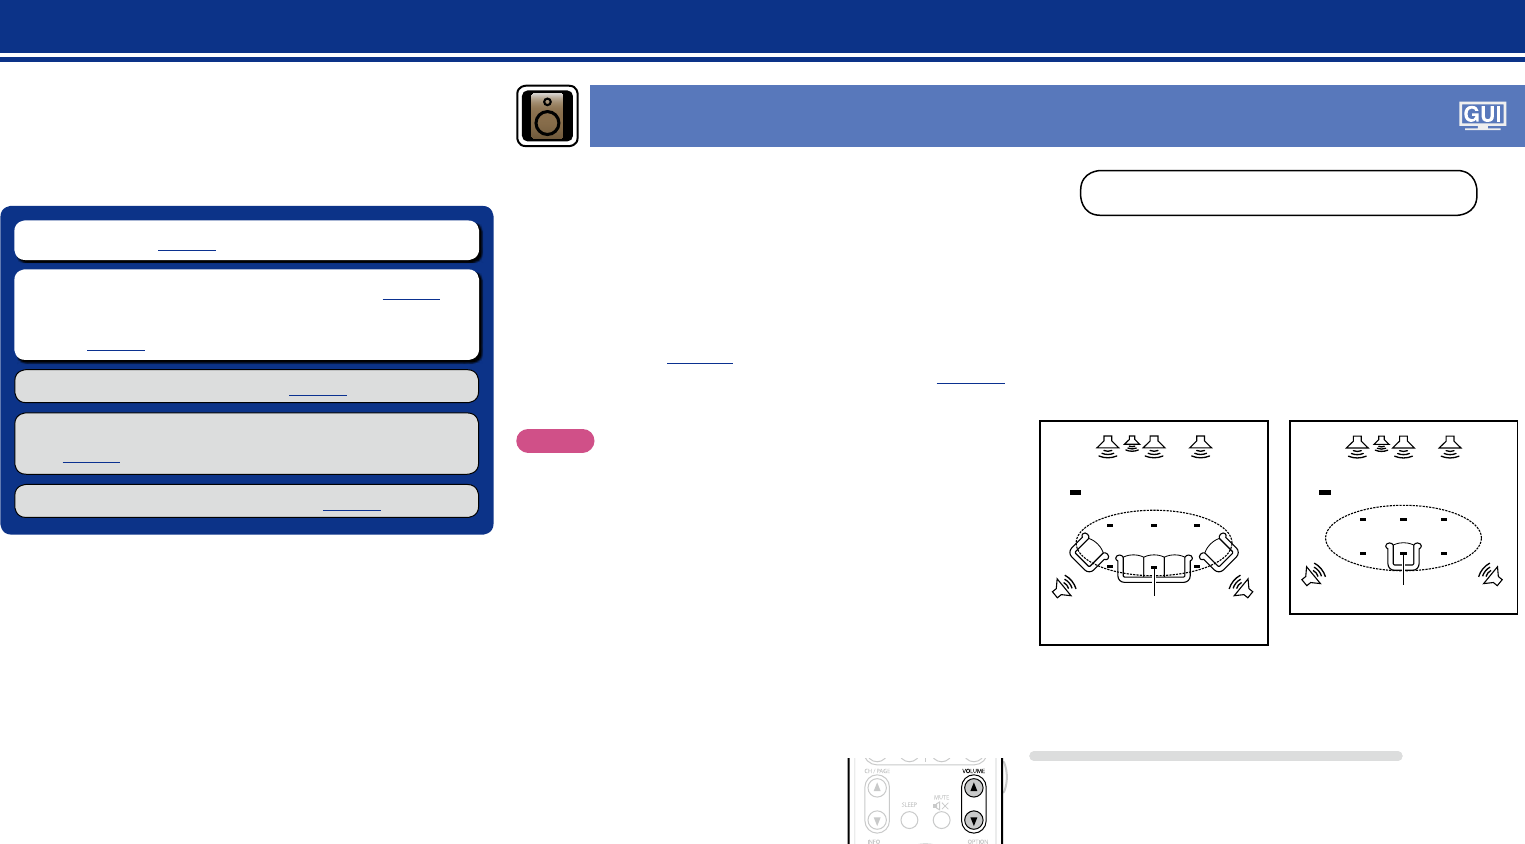
To perform measurement, place the setup microphone in
multiple locations all around the listening area. For best results,
we recommend you measure in six or more positions, as shown
in the illustration (up to eight positions).
•When performing Audyssey
®
Setup, Audyssey MultEQ
®
XT/
Audyssey Dynamic EQ
®
/Audyssey Dynamic Volume
®
functions
become active (vpage112).
•To set up the speakers manually, use “Speakers” (vpage126)
on the menu.
NOTE
•Make the room as quiet as possible. Background noise can disrupt
the room measurements. Close windows and turn off the power on
electronic devices (TVs, radios, air conditioners, fluorescent lights,
etc.). The measurements could be affected by the sounds emitted
by such devices.
•During the measurement process, place cell phones outside the
listening room. Cell phone signals could disrupt the measurements.
•Do not unplug the setup microphone from the main unit until
Audyssey
®
Setup is completed.
•Do not stand between the speakers and setup microphone or allow
obstacles in the path while the measurements are being made. This
will cause inaccurate readings.
•During the measurement process, loud test sounds may be played,
but this is part of normal operation. If there is background noise in
room, these test signals will increase in volume.
•Operating
VOLUME df on the remote
control unit or VOLUME on the main unit
during the measurements will cancel the
measurements.
•Measurement cannot be performed when headphones are
connected. Unplug the headphones before performing Audyssey
®
Setup.
Setup
Here, we explain “Audyssey
®
Setup”, which allows you to
automatically make the optimal settings for your speakers, and
“Network”, which allows you to connect this unit to a home network
(LAN).
This unit lets you play via your home network (LAN) music files stored
on a computer and music content such as that from Internet radio.
n Connect (vpage86)
n Set up speakers (Audyssey
®
Setup) (vpage29)
n Making the network settings (Network)
(vpage35)
Playback (Basic operation) (vpage36)
Selecting a listening mode (Sound Mode)
(vpage77)
Playback (Advanced operation) (vpage92)
Set up speakers (Audyssey
®
Setup)
About setup microphone placement
•Measurements are performed by placing the setup microphone
successively at multiple positions throughout the entire listening
area, as shown in GExample qH. For best results, we recommend
you measure in six or more positions, as shown in the illustration (up
to eight positions).
•Even if the listening environment is small as shown in GExample wH,
measuring at multiple points throughout the listening environment
results in more effective correction.
FL SW C FR
SRSL
*
M
FL SW C FR
SRSL
*
M
(
: Measuring positions)
GExample qH GExample wH
(
: Measuring positions)
FL Front speaker (L) SW Subwoofer
FR Front speaker (R) SL Surround speaker (L)
C Center speaker SR Surround speaker (R)
About the main listening position (*M)
The main listening position is the position where listeners would
normally sit or where one would normally sit alone within the listening
environment. Before starting Audyssey
®
Setup, place the setup
microphone in the main listening position. Audyssey MultEQ
®
XT uses
the measurements from this position to calculate speaker distance,
level, polarity, and the optimum crossover value for the subwoofer.
Basic version
Advanced version
Information
Basic version
v See overleaf
DVD
null
  • Add more products to collection
  • Add more products to collection
  • Add more products to collection
  • Add more products to collection
  • Add more products to collection
  • Add more products to collection
  • Add more products to collection
-

Find a Product