

4.3
Owner's of the Breville Mixer STAND gave it a score of 4.3 out of 5. Here's how the scores stacked up:


17
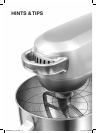
5. Rotate the Speed Control Dial
clockwise. Always begin mixing on the
lowest speed then gradually increase
to the desired higher speed to prevent
ingredients spattering.
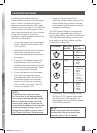
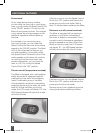
The LED Speed Indicator is conveniently
labeled with suggested mixing tasks for
each speed setting. Use this in combination
with the attachment guide, printed on the
inner body of the Mixer (visible once the
mixing bowl is removed).
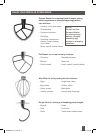
ATTACHMENT Mixing Task
(on LED)
Use For
(see p.9 & 11)
Aerate • Egg Whites
• Meringue
Whip • Eggs
• Cream
Cream • Butter &
Sugar
• Icing
Beat
Light Mix
Fold
• Cake &
Cookie Mix
• Heavy
Batter
• Pastry
• Use 'Fold'
to start
all mixing
procedures
Knead • Pizza &
Pasta
Dough
• Bread
Dough
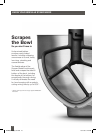
6. If necessary, turn the Speed Control
Dial to the 'OFF' position and scrape
the mixing bowl with a spatula. To
recommence mixing, rotate the Speed
Control Dial clockwise.
NOTE:
Under heavy load with extended
mixing time, the mixer head may
become warm. This is normal.
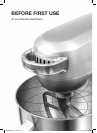
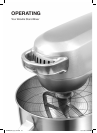
OPERATING THE MIXER
The Breville Stand Mixer features
Planetary Mixing Action, a similar mixing
action used by commercial mixers in
bakeries and patisseries for 360 degree
beater-to-bowl coverage. This is achieved
by the counter-clockwise motion of the
mixer head combined with the clockwise
sweep of the beater. The result is
thoroughly mixed ingredients without the
need for a rotating bowl.
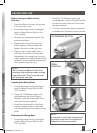
1. Ensure the power cord is unplugged
and the Speed Control Dial is in the
'OFF' position.
2. Assemble the Mixer with the desired
attachment and the mixing bowl
(containing ingredients as directed in
the recipe).
3. Press the 'Tilt-Release' button and
simultaneously use the Lift Assist
Handle to lower the mixer head until it
locks into the closed position. Attach
the pouring shield, if desired.
4. Unwind the power cord completely
and insert the power plug into a
grounded wall outlet. The LED’s on
the speed indicator will illuminate
one-by-one all the way to the top,
then turn off one-by-one. The LCD
screen will display '0:00'.
NOTE:
If the Mixer has not been used
for 3 minutes it will automatically
enter power-saving standby mode.
When in standby mode, the LCD
screen will cease to illuminate. To
re-activate the Mixer out of standby
mode and begin mixing, turn the
Speed Control Dial or press one of
the 'Count Up/Down' timer arrows.
BEM800XL_IB_v10.indd 17 19/11/09 3:16 PM


Find Your Products By Category
Please Login
