
4.1
Owner's of the Breville Bread Maker BBM800XL gave it a score of 4.1 out of 5. Here's how the scores stacked up:


33
OPTIONAL SETTINGS – DELAY START BUTTON
Using the DELAY START button
The DELAY START button conveniently allows you to select
when you’d like the loaf to be ready, automatically starting the
bread maker at the appropriate time. You can set the timer up to
13 hours in advance before you require the baked loaf to be ready.
While the Delay Start feature can be selected on all settings
except for BAKE ONLY and JAM, our experience has shown
that some recipes, particularly yeast free breads, do not mix well
when delayed, while others do. For this reason, we recommend
first testing the recipe with the Delay Start feature before
planning to serve it for the first time.
IMPORTANT
Never use the Delay Start feature if the recipe includes
perishable ingredients such as dairy products, eggs etc.
Some dairy products and eggs may be substituted by
using dried ingredients such as dried egg powders, dried
buttermilk or dry milk. When using this feature with dried
substitutions, add the water to the bread pan first, then add
the dried substitution after the flour to keep them separate.
1. Using the SELECT push-dial, select the desired setting, crust
color and loaf size. Refer to Steps 1-9, ‘Operating your Breville
Bread Maker – Beginners Guide’, page 13.
NOTE
During the delayed time, before the bread making cycle
commences, ensure the surrounding temperature of the
ingredients and baking chamber is not too hot or too
cold. This will ensure efficient operation. Recommended
room temperature is 68°F-77°F (20°C-25°C).
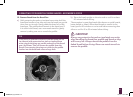
NOTE
When using the Delay Start feature, we recommend
layering ingredients in the bread pan in the order listed
in the recipe, making a small hollow in the center of the
flour (ensuring the hollow does not touch the water,
salt or sugar layer) then placing the yeast in the hollow.
Water, salt or sugar can prematurely activate or decrease
the activity of the yeast and the bread may not rise.
2. Before pressing the START | PAUSE button to activate the
cycle, press the DELAY START button. The LCD screen will
indicate ‘READY IN’ and the preset cycle time will flash.
3. Turn the SELECT push-dial to change the cycle time up
to 13 hours in advance, then press to select. The time
you select relates to the finish time of the baked loaf. For
example, if you select 10 hours, the LCD screen will indicate
‘READY IN’ and ‘10:00 HRS’, meaning the finished loaf will
be ready in 10 hours time.
4. If you accidentally press the wrong time, press the
CANCEL button to return to the main menu and make
your selection again.
5. Press the START | PAUSE button to activate the delay start
feature. The button surround will illuminate red and the LCD
screen will display ‘READY IN’ and begin to count down.
There will be no movement inside the bread pan. Once the
correct time has lapsed, the cycle will automatically begin.
The LCD screen will indicate the time remaining until the
loaf is ready and the progress indicator will flash to indicate
the current phase of the cycle.
BBM800XL_IB_FA.indd 33 1/07/10 10:47 AM


Find Your Products By Category
Please Login
